How to: Creating a Remarketing Audience List for Facebook Ads


Most business people would agree that a proven, easy way to increase your sales is to target your existing customer base. They already have brand familiarity, and they are likely somewhat knowledgeable about the products and services you offer. For a marketer, having a well developed list of your customers is critical to being able to target your existing base.
Lucky for us online marketing types, there are awesome avenues to creating and building a list of individual who are interested in your company. Facebook, Google and Twitter all offer easy-to-use tools to build a remarketing list. The concept is simple, advertise to individuals who have already visited your website before… hence the “re” in remarketing. They’ve seen you before, and now you’re marketing to them again.
In this following blog post, I’ll go through the step-by-step process of creating a remarketing audience list, that you can then use for future facebook campaigns. The assumption has been made that you already have a Facebook business page setup, and that you comfortable with the mechanics of starting an ad campaign within Facebook.
How to Create your Remarketing List

First step is going to your business’s page on Facebook. If you are an ad manager for your page, you’ll see a link to “Promote Business” at the top right of the page. Clicking into this menu brings you to the Ad Manager screen, which provides further options.
 On the Ad Manager screen, on the left hand side, you’ll the advertising menu. Find “Audiences” and click on it to go to the view your current audience lists.
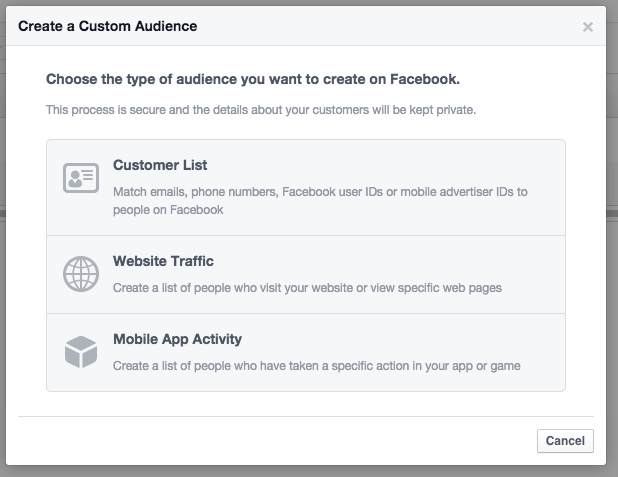
On the Audience page, you’ll click “Create Audience” at the top right of the page, and select “Custom Audience”. This will then bring you to a selection screen, on this screen you should few a options. Click “Website Traffic”.
![]()
The next prompt should allow you to define the parameters of how you want the list built from your website traffic. The options they give you are pretty straightforward, and are applicable to how you may want to market with the list.
Last step in creating the list is to grab what Facebook call’s its “Pixel Code”. This is essentially the tracking code that you will place on your website. Facebook uses this tracker to identify users who visited your website, and then adds them to this new list.
Once the list has been created, and the pixel added your website’s code, you’re all set! Before you can begin using the new list, you’ll need to wait until you enough visitors come to your site to build up a decent list size. Facebook requires at least 20 people, but you’ll likely want to wait until you at least get 100.
Using the Website Visitor List
So you’ve got a list of Facebook users who have visited your website before… now what?
What do you mean ‘now what’!? You have a prime list of individual people who have visited your website! These people know you brand, have interest, and are definitely potential buyers.
My own personal experience has shown that you can get far more engagement for less cost by advertising to this group of people. By advertising to a remarketing list, you’ll waste far less money on clicks from individuals who have little interest in what you offer. Going forward, you can now select to target this specific list of people for future Facebook advertising campaigns.
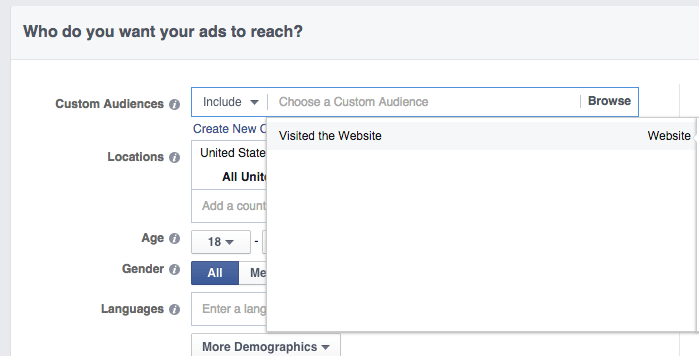
On the audience option screen when setting up a campaign, you should see the list you recently created as an option. So instead of creating the usual targeted lists, maybe based on host of other demographic factors, you can choose the “Visited the Website” list from the custom audience drop down.